10 Genius Office Organization Ideas for Small Spaces (That Actually Work!)
Transform your cramped workspace into a productivity powerhouse with these clever storage solutions, space-saving hacks, and expert-approved strategies
Is your tiny home office drowning in paper piles, tangled cords, scattered sticky notes, and random office supplies that seem to multiply overnight? You’re definitely not alone in this struggle. With the massive shift toward remote work and hybrid schedules, millions of people are now trying to carve out functional workspaces in apartments, bedrooms, and homes that were never designed to accommodate a full office setup.
The challenge is real: How do you create a workspace that supports eight-plus hours of focused productivity when you’re working with a corner of your living room, a bedroom nook, or—let’s be honest—your kitchen table?
The good news? A small office absolutely does not have to mean a cluttered, chaotic, or stressful one. In fact, some of the most inspiring, efficient, and aesthetically pleasing workspaces we’ve ever seen fit into spaces you’d never expect—closets converted into “cloffices,” narrow hallway alcoves, under-stair nooks, and even repurposed armoires.
The secret isn’t having more space. It’s using the space you have with intention, creativity, and smart organizational systems that work with your habits rather than against them.
We’ve spent countless hours researching, testing, and curating 10 brilliant office organization ideas specifically designed for small spaces. These aren’t generic tips you’ve seen a thousand times. These are actionable, practical strategies that maximize every single square inch without sacrificing style, comfort, or functionality.
Whether you’re working from a 400-square-foot studio apartment, trying to share space with a partner or roommate, squeezing a desk into your bedroom, or attempting to transform a closet into a legitimate workspace, these tips will help you create an office environment that sparks joy, enhances productivity, and makes you actually want to sit down and work.
Ready to reclaim your space and your sanity? Let’sdo it.
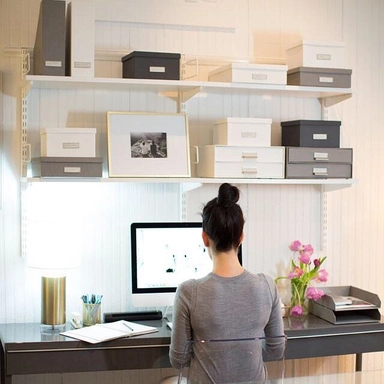
1. Go Vertical with Floating Shelves and Wall-Mounted Storage Systems
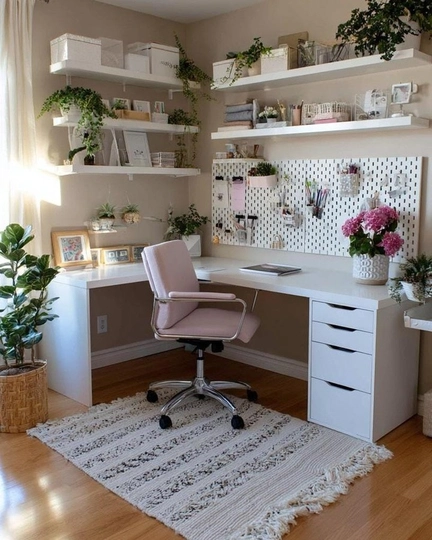
Why it works: When floor space is severely limited, your walls become the most valuable real estate in your entire office. Most people completely underutilize vertical space, leaving entire walls bare while their desks overflow with clutter.
One of the biggest mistakes people make when organizing a small office is thinking horizontally. They buy bigger desks, add more surface area, and try to spread everything out—but in a small space, this approach fails almost immediately. The desk fills up within days, and you’re right back where you started.
Floating shelves completely change the game. They keep your most essential items within arm’s reach while liberating precious desk surface for the actual work you need to do—your computer, keyboard, notepad, and maybe a cup of coffee. That’s it. Everything else can live on the walls.
The beauty of floating shelves is their versatility. You can install them at varying heights to create visual interest and accommodate items of different sizes. Place your highest shelves near the ceiling for things you rarely need—archived files, reference books you consult once a month, or decorative items that add personality without taking up prime workspace. Your middle shelves, positioned at eye level or just above, become home for everyday essentials: the notebooks you grab daily, your most-used reference materials, and supplies you reach for constantly.
But don’t stop at basic floating shelves. Consider a full wall-mounted storage system that might include a combination of open shelving, closed cabinets (to hide less attractive necessities), a pegboard section for ultimate customization, and even a wall-mounted fold-down desk if you’re extremely tight on space.
Pegboard systems deserve special mention here because they’re incredibly underrated for office use. Originally designed for garages and workshops, pegboards have been embraced by the organization community for their endless flexibility. You can add hooks for headphones, small shelves for supplies, bins for cables, and even small magnetic containers for paper clips and pushpins. The best part? You can rearrange everything in seconds as your needs change.
How to make it work for you:
Start by measuring your wall space and sketching out a rough plan before buying anything. Consider the depth of the items you’ll store—most office supplies only need 6-8 inches of shelf depth, which keeps shelves from protruding too far into your workspace and feeling bulky or claustrophobic.
Think about weight distribution too. Heavier items like books should go on lower shelves with appropriate wall anchors, while lighter items can live higher up. If you’re renting and can’t drill into walls, look into damage-free mounting options like heavy-duty adhesive strips designed for shelving, or consider a freestanding ladder shelf that leans against the wall.
Pro tip: Paint your floating shelves the same color as your wall for a seamless, built-in look that makes the space feel larger and more cohesive. Or go bold with a contrasting color that turns your storage into a design statement.
2. Embrace the Life-Changing Power of Drawer Organizers and Dividers
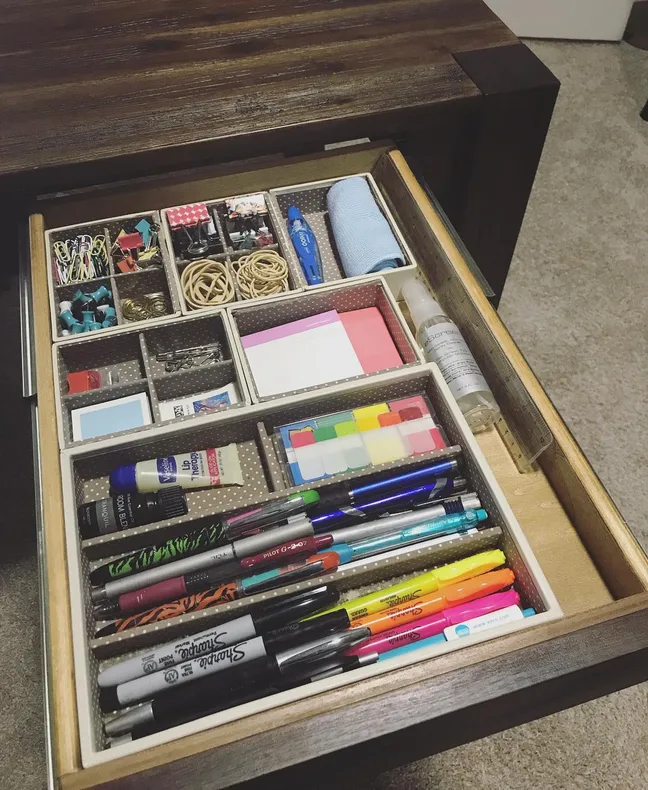
Why it works: That single desk drawer you have? It can hold an absolutely impressive amount of supplies—if you organize it properly. Without a system, drawers become black holes where items disappear, duplicates accumulate, and finding a simple paper clip turns into an archaeological expedition.
Let’s talk about the junk drawer phenomenon. Almost everyone has one—that drawer where you toss things when you don’t know where else to put them. Receipts, random cables, dead batteries mixed with good ones, pens that may or may not work, old business cards from people you don’t remember meeting. Sound familiar?
The problem with junk drawers isn’t just aesthetic. They’re genuine productivity killers. Studies have shown that visual clutter increases cognitive load and stress while decreasing focus and efficiency. Every time you open that chaotic drawer looking for a specific item, your brain has to process all that visual noise. It takes mental energy that could be spent on your actual work.
Drawer organizers solve this problem completely. They create dedicated homes for every category of item, which means you always know exactly where to find what you need and exactly where to put things away. This two-way system is crucial—organization only works long-term if putting things away is as easy as taking them out.
The market for drawer organizers has exploded in recent years, giving you endless options. Expandable bamboo organizers are incredibly popular because they adjust to fit almost any drawer size and look naturally attractive. Modular plastic systems let you customize configurations and add or remove sections as your needs change. Velvet-lined jewelry organizers work beautifully for small items like paper clips, pushpins, and USB drives. Even simple cardboard dividers or repurposed small boxes can transform a drawer when you’re on a budget.
What to include in your organized drawer:
Think categories, not just items. You might have a writing section (your 2-3 favorite pens—not the 47 random ones that accumulated—plus pencils and highlighters), a fastening section (paper clips, binder clips, pushpins, rubber bands, tape), a technology section (charging cables, adapters, USB drives, earbuds), and a paper section (sticky notes in various sizes, small notepads, stamps if you still mail things).
The key is giving every single item a designated home. When you finish using something, it goes back to its spot. When you need something, you know exactly where to reach. This sounds simple, but it’s genuinely transformative.
Pro tip: Before organizing your drawer, empty the entire thing onto your desk. Go through every item and be ruthless. Dried-out pens? Trash. Cables for devices you no longer own? Recycle. Duplicates of things you only need one of? Donate or relocate. Only put back items you actually use in your daily or weekly work. You’ll be shocked at how much space appears when you eliminate what you don’t need.
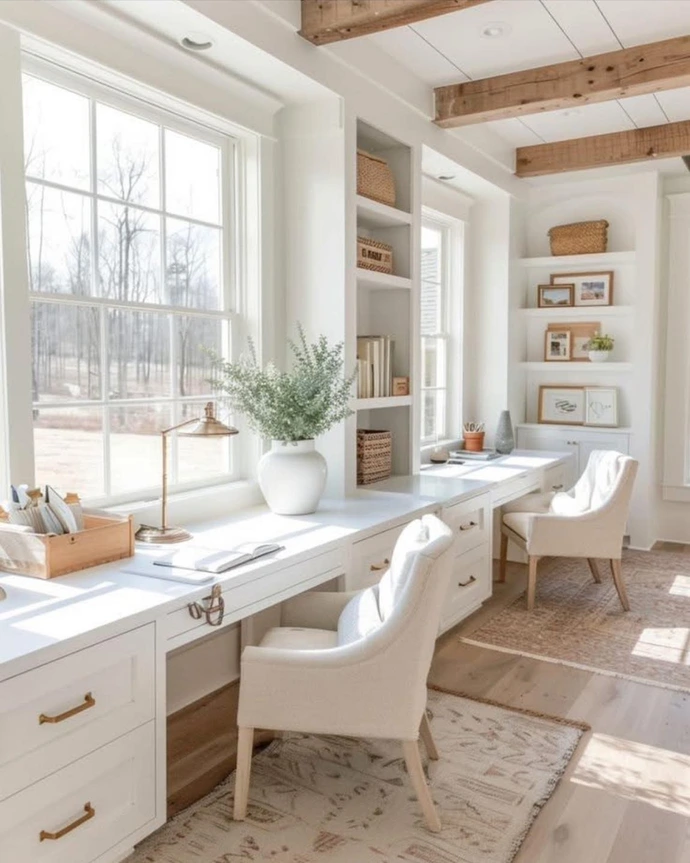
3. Invest in a Compact Desk with Built-In Storage Features
Why it works: Your desk is the foundation of your entire workspace. Choosing the wrong desk for a small space is like wearing shoes two sizes too small—everything else suffers as a result. The right desk, however, can essentially double your storage capacity without taking up any additional floor space.
When shopping for a small space desk, most people focus on the surface dimensions—and that’s certainly important. But equally crucial is what’s happening inside and around the desk. Built-in storage features can make an enormous difference in how functional and organized your workspace feels.
Look for desks that incorporate some or all of these features: built-in drawers (even one or two small ones make a huge difference), an integrated keyboard tray that slides out when needed and tucks away when not in use, built-in cable management channels or grommets that keep cords organized and out of sight, a monitor shelf or riser that creates storage space underneath, and cubbies or compartments for frequently used items.
Secretary desks and fold-down wall desks deserve special attention for extremely small spaces. These ingenious designs allow you to close up your entire workspace at the end of the day, hiding clutter and mentally separating work life from home life—which is increasingly important in our work-from-home world. When closed, they look like a cabinet or even a piece of art. When opened, they provide a fully functional workspace with built-in shelving and compartments.
Ladder desks are another excellent option, combining a desk surface with ascending shelves in a single footprint. They take advantage of vertical space while keeping everything you need within arm’s reach. Corner desks maximize awkward angles that might otherwise go unused. L-shaped desks, if you have room for them, provide tons of surface area while fitting neatly into corners.
If you’re on a budget or can’t find a desk with the exact features you need, consider “hacking” a basic desk with add-ons. Desktop organizers, under-desk drawers that roll out, clip-on desk shelves, and monitor arms with built-in storage all help compensate for a basic desk’s lack of features.
How to choose the right compact desk:
First, measure your available space meticulously—and don’t forget to account for the chair and your body! You need room to pull the chair back, sit down, and move comfortably. A desk that technically fits but leaves you squeezed in tight will be miserable to use.
Second, think about how you work. Do you need multiple monitors? Make sure the desk surface can accommodate them. Do you spread out papers and materials? You might need more surface area and less built-in storage. Do you primarily work on a laptop? A smaller surface with more vertical storage might be ideal.
Pro tip: Consider a standing desk converter or a height-adjustable compact desk if your budget allows. Standing periodically throughout the day has documented health benefits, and many standing desk options have surprisingly small footprints. Some even fold completely flat against the wall when not in use.
4. Master the Art of Cable Management Once and For All
Why it works: Few things make a small office feel more chaotic than a tangled mess of cables snaking across your desk, drooping behind your monitor, and pooling on the floor in a dust-collecting heap. Proper cable management isn’t just aesthetic—it makes your space more functional, easier to clean, and even safer.
In today’s digital workspace, cables are unavoidable. Between your computer, monitor (or monitors), keyboard, mouse, phone charger, desk lamp, printer, and whatever other devices you use, you’re dealing with a significant number of cords that all need to connect to power outlets and sometimes to each other.
Left unmanaged, these cables create visual chaos that makes your entire office feel cluttered and stressful. They also create practical problems: cables draped across your desk get in the way of your work, loose cables behind your desk collect dust and become nearly impossible to clean around, and the tangled mess makes it frustrating to add new devices or troubleshoot problems.
The good news is that cable management solutions have become incredibly accessible and affordable. You don’t need to hire a professional or spend a fortune—just a few strategic products and an hour of effort can completely transform your setup.
Start under the desk, where the worst cable chaos typically lives. An under-desk cable management tray or basket is often the single most impactful purchase you can make. These mount to the underside of your desk and hold power strips, excess cable length, and adapters completely out of sight. Your cables drop down from your devices, disappear into the tray, and emerge only to reach the wall outlet. Suddenly, the space under your desk goes from a cable jungle to clean open floor that’s easy to vacuum.
On the desk surface, cable clips and channels keep individual cords in place and running neatly along edges rather than sprawling across your workspace. Velcro cable ties let you bundle cables together while still allowing easy separation when you need to unplug something. Cable sleeves wrap multiple cords into a single neat tube.
For charging cables you use frequently—like your phone charger—a charging dock or station keeps everything upright, visible, and accessible while eliminating the chaos of loose cables. Some people prefer a wireless charging pad for an even cleaner look, assuming your devices support wireless charging.
How to approach cable management systematically:
Don’t try to manage the chaos in place. Unplug everything, pull all cables out, and start fresh. Group cables by device or by function. Route them intentionally, thinking about the shortest path from device to power source. Then use your management tools—trays, clips, ties, sleeves—to keep everything in place.
Label your cables at both ends. This sounds obsessive, but when you need to unplug something specific six months from now, you’ll be incredibly grateful. Simple masking tape and a marker work fine, or you can buy dedicated cable labels for a neater look.
Pro tip: When buying cables, opt for the exact length you need rather than defaulting to longer cables “just in case.” Excess cable length is the primary source of cable clutter. Many electronics stores and websites now offer cables in precise lengths, and you can also find adjustable/retractable cables that extend only as far as needed.
5. Implement a Paperless (or Paper-Minimal) Document System
Why it works: Paper is the number one source of clutter in most home offices. It accumulates faster than almost anything else—mail, receipts, notes, printed documents, magazines, catalogs—and unlike digital files, paper takes up actual physical space that you simply don’t have in a small office.
The dream of a completely paperless office has been promised since the early days of personal computing, and while it’s now more achievable than ever, complete elimination of paper isn’t realistic or even desirable for most people. Some documents legally require physical copies. Some people think and brainstorm better on paper. Some items—like meaningful cards or important original documents—have intrinsic value beyond their information content.
The goal, then, isn’t necessarily to eliminate paper entirely but to minimize it dramatically and create smart systems for handling what remains. This combination of going digital wherever possible and organizing the physical papers you keep is the key to conquering paper clutter in a small space.
Start by stopping paper at the source. Sign up for paperless billing and statements from every possible service. Unsubscribe from physical catalogs and junk mail (services like Catalog Choice and DMAchoice make this easy). Put a “no junk mail” sign on your mailbox if your postal service honors them. Cancel magazine subscriptions in favor of digital editions. Use digital note-taking apps instead of paper notebooks when possible.
For paper that does enter your space, process it immediately rather than letting it pile up. Create a simple sorting system: trash/recycle, action required, file/archive, or scan and toss. The key is making decisions about paper the moment it arrives, not letting it accumulate in a “to sort” pile that grows indefinitely.
Invest in a good scanner or use your phone’s scanning capabilities to digitize important documents. Modern phone cameras and apps like Adobe Scan, Microsoft Lens, or the built-in scanning features in iOS and Android create high-quality PDFs that are fully searchable. Once you’ve scanned a document, you can file the original if legally required, or simply recycle it knowing you have a digital backup.
For the paper you do keep, create a streamlined filing system that makes sense for your life. You don’t need dozens of detailed categories—often, a few broad categories (financial, medical, home, work, personal) work better than over-complicated systems that become too burdensome to maintain. Use a compact desktop file organizer or a single file drawer rather than a full filing cabinet.
How to maintain a paper-minimal office:
Create a daily habit of processing incoming paper. It takes only a few minutes a day but prevents accumulation. Touch each piece of paper only once if possible—decide immediately whether it’s trash, needs action, or needs filing.
Schedule a monthly “paper purge” where you go through your files and shred or recycle anything that’s no longer needed. Most documents don’t need to be kept forever—check guidelines for document retention times (available from the IRS and various consumer resources) so you’re not hoarding papers unnecessarily.
Pro tip: Create a “current projects” zone—a single folder, tray, or bin where papers for active projects live. This keeps them accessible and visible without cluttering your entire desk. Once a project is complete, digitize the papers if needed and clear the zone for the next project.
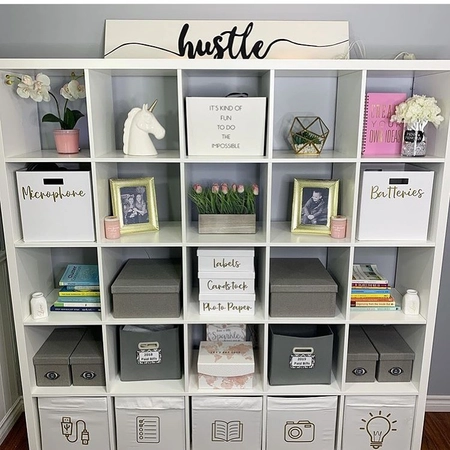
6. Use Hidden Storage in Plain Sight with Decorative Boxes and Containers
Why it works: Not everything in your office is beautiful, and that’s okay. Cables, backup supplies, random tech accessories, personal items—some things are necessary but not exactly Instagram-worthy. Decorative storage containers let you keep these items accessible while maintaining a clean, intentional aesthetic.
Small offices benefit enormously from the “everything has a home” principle, but that doesn’t mean every home needs to be visible. In fact, hiding certain items behind attractive facades can make your space feel dramatically more organized and peaceful.
The concept is simple: instead of leaving unattractive items exposed on shelves or shoved into corners, you corral them into beautiful boxes, baskets, bins, or containers that contribute to your décor rather than detracting from it. The mess is still there—it’s just contained and camouflaged.
This approach works on multiple levels. Practically, you can find what you need because items are grouped logically in containers rather than scattered randomly. Aesthetically, your space looks curated and intentional rather than chaotic. Psychologically, visual calm reduces stress and improves focus. And practically again, containers make cleaning easier—you can simply move a box rather than individually relocating 30 small items.
The options for decorative storage are nearly endless. Woven baskets bring warmth and texture to any space and work beautifully on open shelving. Fabric bins with coordinating patterns can tie together a room’s color scheme. Wooden boxes add natural elegance and are often sturdy enough to stack. Metal containers can bring industrial or modern vibes depending on their finish. Vintage tins, ceramic vessels, and repurposed containers like old cigar boxes or tea caddies add personality and uniqueness.
When choosing decorative storage, think about what you’re storing and how often you’ll access it. Items you use frequently should go in containers that open easily—flip-top bins, open baskets, or boxes with hinged lids. Items you rarely need can go in harder-to-access containers that prioritize appearance over convenience.
How to implement decorative storage effectively:
Start by grouping your “unattractive necessities” into categories. Maybe you have a category for backup supplies (extra paper, replacement ink, etc.), another for tech accessories (cables, adapters, batteries), another for personal items (snacks, medications, personal care), and another for reference materials you keep but don’t display.
Choose containers that make sense for each category’s size and your access frequency. Label the containers (even a discrete label on the bottom helps you remember what’s where) so you can find things later. Arrange them thoughtfully on shelves or in cabinets.
Pro tip: Coordinate your decorative storage with your overall office design scheme. If your space leans minimal and modern, choose clean-lined boxes in a single neutral color. If your style is bohemian or eclectic, mix and match patterns and materials. If you love traditional décor, look for classic wicker baskets or leather storage boxes. Cohesive storage choices make your office look intentionally designed rather than randomly assembled.
7. Create Dedicated Zones for Different Tasks and Activities
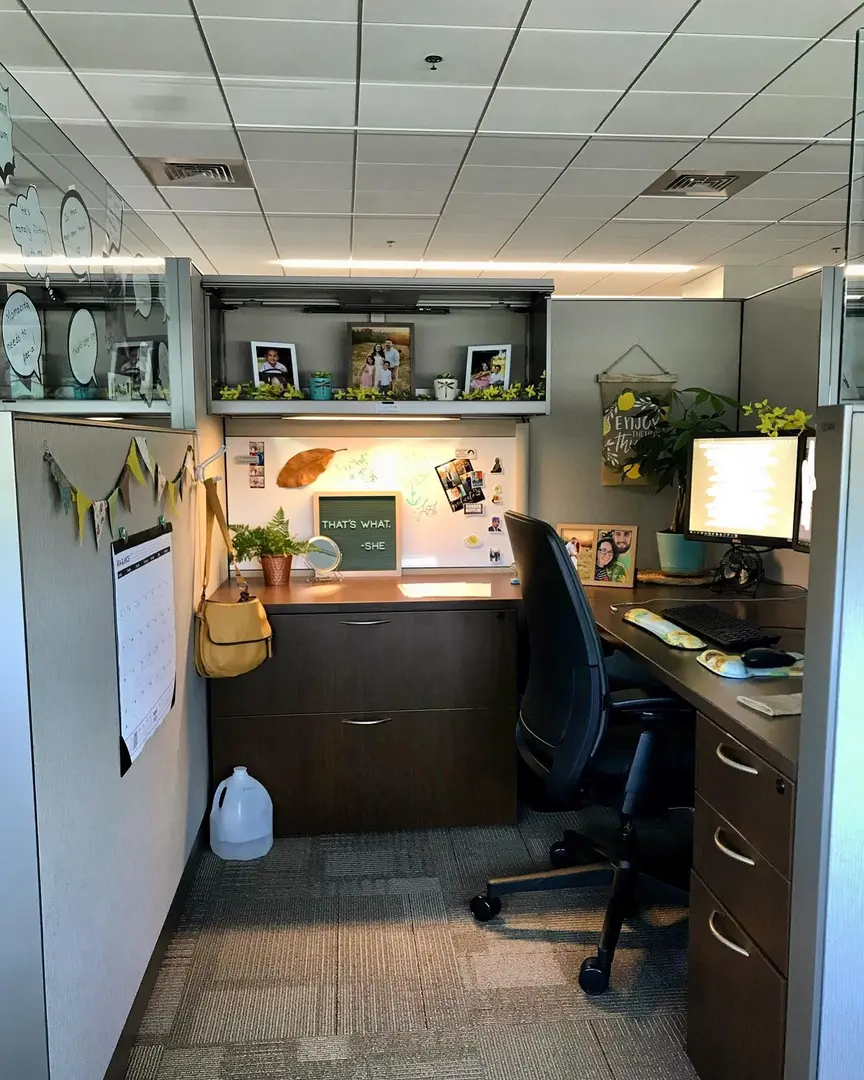
Why it works: Even the tiniest office can benefit from the concept of “zones”—designated areas for specific tasks or categories of work. Zones create mental clarity, improve efficiency, and prevent the creep of one activity’s materials into another’s space.
In a large office, zoning happens naturally. You might have a desk area for computer work, a reading chair for reviewing documents, a meeting table for collaborations, and a filing area for archives. In a small space, you don’t have room for separate furniture pieces, but you can still create micro-zones that serve the same psychological and organizational function.
The principle behind zoning is that your brain works better when contexts are clear. When you sit down at a specific spot that’s set up for focused computer work, with only computer work materials present, you transition more easily into that mindset. When every activity—computer work, phone calls, brainstorming, filing, personal tasks—happens in the same undifferentiated space surrounded by materials from all tasks, your brain has to work harder to focus.
In a small office, zones might be sections of your single desk, shelves designated for specific categories, or even different containers that you pull out for different tasks. The key is intentionality and consistency.
For example, you might designate the right side of your desk as your “active work zone” where your computer, keyboard, and mouse live—and nothing else. The left side might be your “analog zone” for writing, brainstorming, and paper-based tasks, with your notebook, quality pens, and sticky notes. A specific drawer might be your “communication zone” with your phone stand, earbuds, and business cards. A particular shelf might be your “reference zone” with the books and materials you consult regularly.
You can extend zoning beyond your immediate workspace too. Maybe you designate a specific corner of your room as your “reading and thinking” spot with a comfortable chair (even a floor cushion works) for times when you need to step away from the computer. Maybe you have a specific closet shelf that serves as your “archive zone” for materials you need to keep but rarely access.
How to implement zoning in your small office:
First, list all the activities and tasks you perform in your office. Computer work, phone calls, video meetings, writing, brainstorming, filing, shipping packages, personal admin—whatever you do regularly.
Then look at your space and imagine how you might dedicate specific areas or containers to specific activities. Sketch it out if helpful. Consider which activities share materials and could overlap, and which really need distinct separation.
Finally, implement your zones and—this is crucial—maintain the boundaries. When you finish a task, return its materials to their zone. Don’t let activities and their associated stuff bleed into each other.
Pro tip: Visual markers can help reinforce zones. A specific desk mat can define your computer work zone. A different colored container can mark your “current project” zone. A small plant can mark the boundary between your work zones and personal zones. These visual cues help your brain recognize and respect the boundaries you’ve created.
8. Maximize Closet and Cabinet Space with Smart Organizers
Why it works: If you have any closet space in or near your office—even a small section of a shared closet—optimizing it can dramatically increase your total storage capacity. The same goes for cabinets, armoires, or any enclosed storage furniture you might have.
Closets are often grossly underutilized. People stack things haphazardly on single shelves, leave huge amounts of vertical space unused, and ignore the potential of doors entirely. With strategic organization, you can typically double or even triple the functional storage capacity of any closet.
Start by assessing your closet’s potential. If it has a single shelf and a hanging rod (as many closets do), consider whether you actually need that rod. If you’re using the closet for office storage rather than clothes, removing the rod opens up significant usable space. You can add additional shelving—either built-in adjustable shelving if you own your home, or freestanding shelf units that fit inside the closet if you’re renting.
Vertical space is the key to closet optimization. Look up—there’s almost always unused space above your highest shelf that could fit another shelf or storage bins. Look at the floor—a small shelf unit or stacking bins can turn bare floor space into functional storage. Look at the door—over-door organizers designed for shoes work beautifully for office supplies, and over-door pocket organizers can hold files, notebooks, and flat items.
If you have a closet deep enough, consider transforming it into a full “cloffice” (closet office). This popular small-space solution puts your entire desk and primary work area inside the closet. When you’re working, the closet doors are open (or removed entirely). When you’re done for the day, you can close the doors and completely hide your workspace, creating better work-life boundaries and keeping your main room visually clean.
For cabinets and armoires, the same principles apply. Most cabinets have one or two shelves that leave huge amounts of vertical space unused. Adding small shelf risers, stacking bins, or additional shelf inserts can multiply your storage capacity. Door-mounted organizers work on cabinet doors too. Drawer organizers maximize whatever drawers you have.
How to optimize closet and cabinet space:
Empty the entire closet or cabinet first. Clean it while it’s empty—closets and cabinets rarely get cleaned and can harbor a lot of dust. Then, before putting anything back, assess what you’re actually storing and whether you still need all of it.
Measure the interior dimensions and plan your organization strategy. Sketch it out or use an online closet planning tool. Identify products that will help maximize the space—additional shelving, bins, door organizers, etc.
Install or add your organizing products, then put items back deliberately. Group similar items together. Put frequently accessed items at accessible heights; rarely accessed items can go high or low.
Pro tip: If your closet has a light, make sure it works well or add battery-operated LED lights. A well-lit closet is much more functional than a dark cave where you can’t see what you have. Adhesive-backed LED light strips are inexpensive and easy to install.
9. Adopt the “One In, One Out” Rule to Prevent Future Clutter

Why it works: Organization isn’t a one-time project—it’s an ongoing practice. Without systems to prevent new clutter from accumulating, even the most beautifully organized small office will return to chaos within months. The “one in, one out” rule is the simplest and most effective way to maintain your hard-won organization.
The concept is exactly what it sounds like: whenever you bring one new item into your office, one existing item must leave. Buy a new pen? An old pen gets donated or tossed. Get a new book? An old book goes to the little free library. Acquire a new piece of desk décor? An old piece finds a new home. No exceptions.
This rule works because it directly addresses the root cause of clutter: accumulation. Most clutter doesn’t appear suddenly. It builds gradually as new items enter your space faster than old items leave. Over time, this slow accumulation overwhelms any organizational system you have in place.
The “one in, one out” rule breaks this cycle by ensuring that the total number of items in your space never increases. Your space can accommodate a certain number of possessions comfortably—once you’ve decluttered and organized, you’ve essentially found that number. The rule keeps you at that number indefinitely.
Beyond preventing physical clutter, this rule also encourages mindful consumption. When you know that acquiring something new means releasing something you already own, you think more carefully about whether you really need or want the new item. Often, you’ll decide that what you already have is good enough. This saves money, reduces waste, and keeps your space uncluttered.
For a small office specifically, the rule is even more important because you have no buffer capacity. In a large space, you might be able to absorb some accumulation before it becomes a problem. In a small space, every single item matters. Even modest accumulation quickly overwhelms limited storage.
How to implement “one in, one out”:
Make a commitment to follow the rule and stick to it. That’s honestly the main thing—the rule only works if you actually enforce it. Some people find it helps to keep a donation box in or near their office. When something new comes in, they immediately identify the corresponding “out” item and put it in the donation box. When the box is full, they drop it at a donation center.
Be honest with yourself about equivalent exchanges. A new filing cabinet coming in probably means more than one small item needs to go out. Adjust accordingly.
Pro tip: Once or twice a year, do a “sweep” even if you’ve been following the rule. Walk through your office with fresh eyes and identify anything that’s no longer serving you. Our needs change over time, and items that were useful six months ago might be dead weight now. Periodic purges supplement the “one in, one out” rule to keep your space optimally lean.
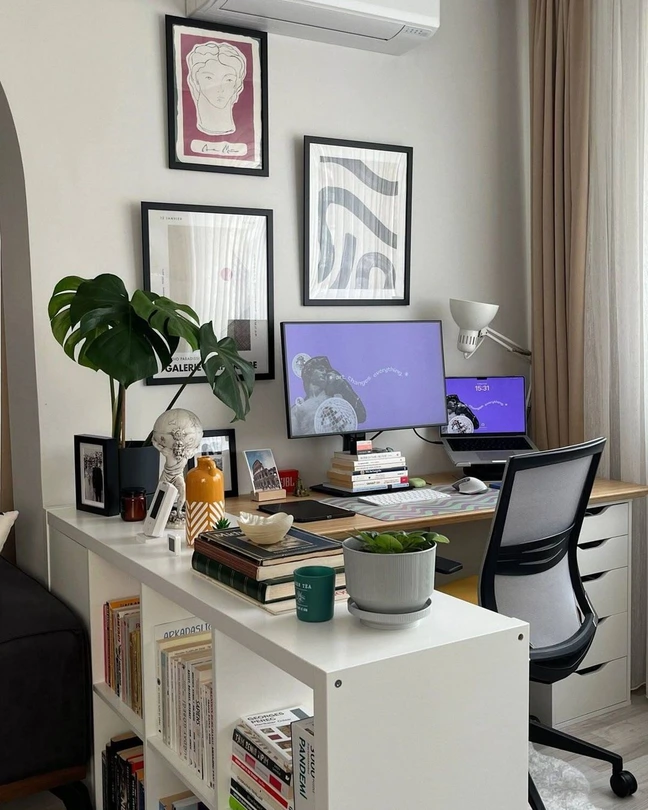
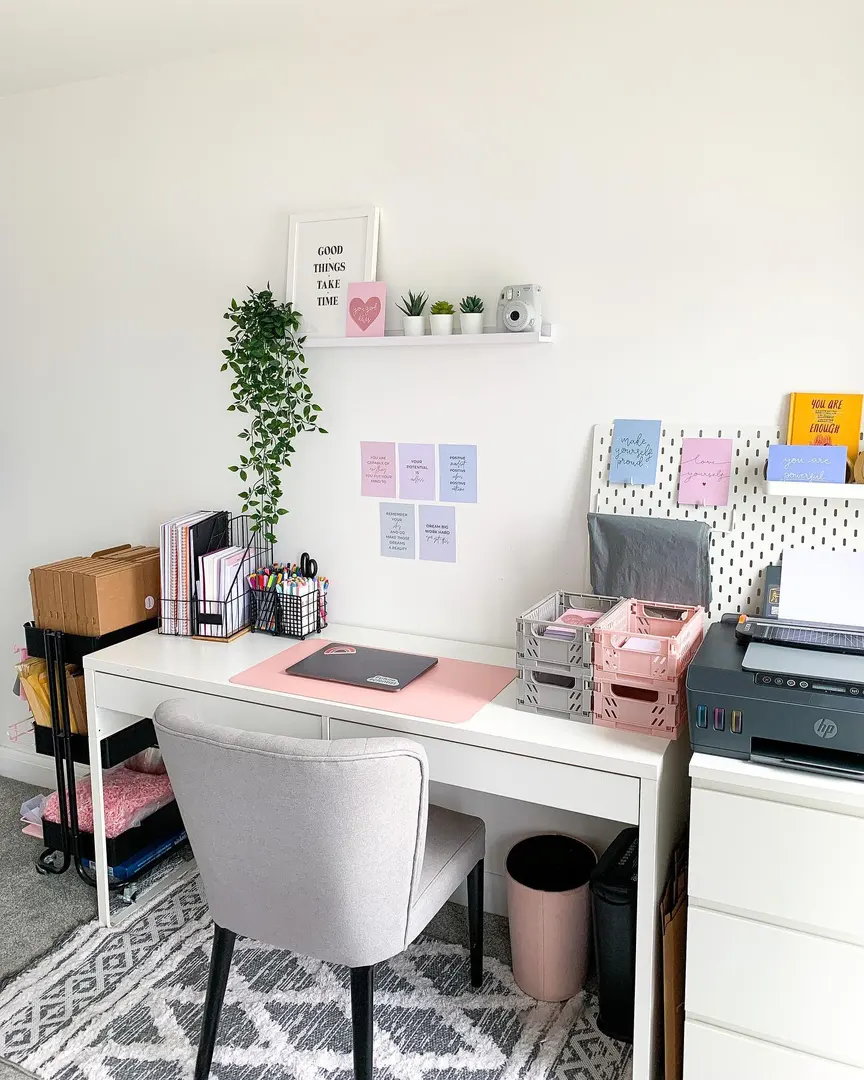
10. Personalize with Intention: Choose Décor That Serves Double Duty
Why it works: Your office should reflect your personality—but in a small space, every item needs to earn its spot. The solution? Choose personal touches and decorative elements that serve functional purposes too. This approach lets you express yourself without sacrificing precious space to items that are purely decorative.
A sterile, personality-free office might be organized, but it’s also uninspiring and uncomfortable to spend long hours in. Research consistently shows that personalized workspaces improve mood, reduce stress, and increase productivity. People work better in spaces that feel like their own.
But in a small office, you simply can’t afford much purely decorative space. Every square inch matters. The trick is finding items that bring you joy and serve practical functions—ideally, doing both jobs better than separate items would.
Consider lighting. You need good task lighting to work effectively, but a basic desk lamp is purely utilitarian. Instead, choose a lamp that’s also a design statement—something in a style, color, or shape that makes you happy every time you look at it. You get the functional lighting you need plus the aesthetic pleasure of a beautiful object. One item, two purposes, no wasted space.
The same principle applies across categories. You need something to hold pens—why not a beautiful handmade ceramic cup or a vintage container that brings you joy? You need a clock—why not one that’s also an art piece? You need a wastebasket—why not a gorgeous woven basket that adds texture and warmth? You need a mouse pad—why not one printed with your favorite artwork or a meaningful photograph?
Plants are perhaps the ultimate double-duty décor item. They beautify your space, bringing life, color, and natural elements into even the most sterile environment. But they also purify air, reduce stress, muffle sound, and have documented benefits for concentration and well-being. A plant is never purely decorative—it’s always working for you.
How to choose functional décor for your small office:
Look at every functional item you need in your office—lamp, clock, trash can, pen holder, mouse pad, bulletin board, organizers, etc.—and see each one as an opportunity for personality. Search for versions that are functional and beautiful or meaningful to you.
When considering purely decorative items (art, photos, figurines), ask whether they could serve any function. Could that framed photo have a small shelf attached to hold a few items? Could that art piece incorporate a hook for your headphones? Could that figurine actually be a paperweight? Get creative.
For wall décor, consider functional options like corkboards (which can be beautiful and serve as inspiration boards), wall-mounted shelves that display decorative items while also providing storage, or wall planters that bring in greenery.
Pro tip: Don’t add decorative items all at once. Live with your organized, functional space for a few weeks first. Then add personal touches slowly, one at a time, assessing whether each addition actually improves how the space looks and feels. This prevents over-decorating and ensures every item earns its place.
Final Thoughts: Your Small Office Can Be Your Best Office
Organizing a small office isn’t about having less or living like a minimalist monk (unless that’s your thing). It’s about being intentional with every square inch you have. It’s about choosing items that serve multiple purposes, creating systems that work with your habits, and maintaining those systems with simple daily practices.
The ten ideas we’ve shared here work together as an integrated approach to small office organization:
- Go vertical to maximize wall space
- Organize drawers to eliminate junk drawer chaos
- Choose smart furniture that builds in storage
- Manage cables to eliminate visual and practical chaos
- Go digital to reduce paper accumulation
- Use decorative storage to hide necessities beautifully
- Create zones for mental clarity and efficiency
- Optimize closets to expand your total storage
- Follow “one in, one out” to prevent future clutter
- Personalize intentionally with functional décor
You don’t have to implement all ten at once. Start with whichever ideas address your biggest pain points. Even implementing two or three of these strategies can dramatically transform how your small office looks, feels, and functions.
Remember: some of the world’s most creative, productive people have worked in tiny spaces. A small office can actually be an advantage—everything you need is within arm’s reach, there’s nowhere for clutter to hide, and limitations often spark creativity.
Your space is what you make of it. Make it organized. Make it functional. Make it yours.
Did you find these tips helpful? Save this article to your Pinterest board and share it with friends who are struggling with small space organization. And check out our other articles for more home organization inspiration!