
Fall cooking leans hard on the pantry: dried beans, broth, canned tomatoes, rice, flour and a shelf full of warm spices. When that shelf is a jumble, you buy duplicates, lose track of expiration dates and spend five minutes hunting for the cumin.
This guide walks through a full reset you can finish in an afternoon, then shows how to keep it working all season with a few minutes a week.
Step 1: Empty, Sort and Purge
You can’t organize what you can’t see, so start by taking everything out. Work one shelf at a time if a full empty-out feels like too much.
- Pull everything out and set it on the counter or table.
- Wipe the shelves. A damp cloth with warm soapy water, then dry thoroughly. Look for crumbs or webbing in corners, which can signal pantry moths.
- Check dates and condition. Toss anything with bulging or badly dented cans, rancid-smelling oils, nuts or whole grain flours, or any sign of bugs.
- Group like with like on the counter: all the pasta together, all the canned tomatoes together, and so on.
- Make a donate pile for unexpired items you will never use. Food banks welcome sealed, in-date cans and boxes.
As you sort, keep a running list of what you are low on. That becomes your restock list.
Step 2: Set Up Zones
A zone is simply a spot where one category always lives. Zones mean everyone in the house knows where things go back, which is what actually keeps a pantry tidy.
Suggested Pantry Zones
- Baking: flour, sugars, baking soda and powder, vanilla, chocolate chips, canned pumpkin, evaporated milk.
- Grains and pasta: rice, wild rice, Arborio, oats, egg noodles, dried pasta.
- Beans and lentils: dried and canned beans, lentils.
- Canned and jarred: tomatoes, tomato paste, coconut milk, chipotles in adobo, pickles, sauces.
- Broths and stocks: cartons and bouillon.
- Oils and vinegars: olive oil, neutral oil, cider vinegar, balsamic, soy sauce, Worcestershire.
- Spices and dried herbs (more on these below).
- Breakfast and snacks: cereal, crackers, nut butters.
- Backstock: a top or bottom shelf for extras bought on sale.
Where Each Zone Should Go
- Eye level and front: what you grab most, like oils, broth, canned tomatoes and pasta.
- Higher shelves: lighter, less-used items and backstock.
- Lower shelves: heavy items like bulk flour, potatoes and onions, plus kid-friendly snacks.
- Door racks: spices, small jars and packets that get lost on deep shelves.
Keep oils and spices away from the stove and oven if possible. Heat and light shorten their shelf life.
Room-by-room: small pantries, deep cabinets and no pantry at all
The zone system works in any kitchen, but the layout changes with the space you have. Here is how to adapt it to the three most common situations.
A small reach-in pantry
A closet-style pantry with four or five shelves, each 12 to 16 inches deep, is the easiest to organize because everything is within arm’s reach. The usual problem is that the shelves are spaced too far apart, which wastes vertical space.
- Add shelf risers to split a tall gap into two levels: cans on the riser, jars beneath.
- Hang an over-the-door rack for spices, packets and small bottles. It adds the equivalent of a full shelf.
- Use bins as drawers. A 12-inch-deep shelf holds two rows of bins; pull the front bin out to reach the back one.
- Keep the floor clear except for one bin of potatoes and onions and one for backstock drinks. A cluttered floor makes the whole pantry feel full.
Deep cabinets and corner cupboards
Cabinets 20 inches or deeper swallow food. Anything in the back row is effectively gone, which is how three open jars of cumin happen.
- Turntables for oils, vinegars, sauces and spices. A 12-inch turntable fits most cabinets and puts every bottle within a quarter turn.
- Long, narrow bins that run front to back, one per category. Pull the bin, take what you need, slide it back.
- Tiered can risers so you see all three rows at once.
- Pull-out shelves or wire baskets if you own the home. They are the single best upgrade for a deep base cabinet.
- Put depth to work for FIFO. The open bag of rice goes in front and the unopened one behind it, so the older package is always the one you reach.
Corner cabinets with a lazy Susan are best for bulky, rarely used items: the big jug of oil, the 10-lb bag of flour, holiday baking supplies.
No pantry at all
Plenty of kitchens have a few cabinets and nothing else. The answer is to spread the zones across more than one place and be strict about what earns a spot.
- Dedicate one upper cabinet to daily staples: oils, salt, pepper, the six spices you use most, rice, pasta and broth. This is the working pantry.
- Move backstock elsewhere. A shelf in a hall closet, a rolling cart, or a lidded bin under a bed for cans and unopened dry goods. Sealed packages are fine anywhere cool and dry.
- Add a freestanding shelf or cart on any free wall. A 12-inch-deep bookshelf or a three-tier metal cart holds a surprising amount, and the cart rolls out of the way.
- Use the top of the fridge for a bin of bread, chips and crackers, not for oils or spices, since the fridge gives off heat.
- Decant more aggressively. Square containers on a single shelf hold about twice what the original bags do.
Whatever the layout, keep the same rule: every category has one home, and the label on the shelf or bin says what it is. That is what keeps the system running when someone else puts the groceries away.
Step 3: Choose the Right Containers
Containers are useful, but only buy them after you’ve sorted and know what you actually need to hold.
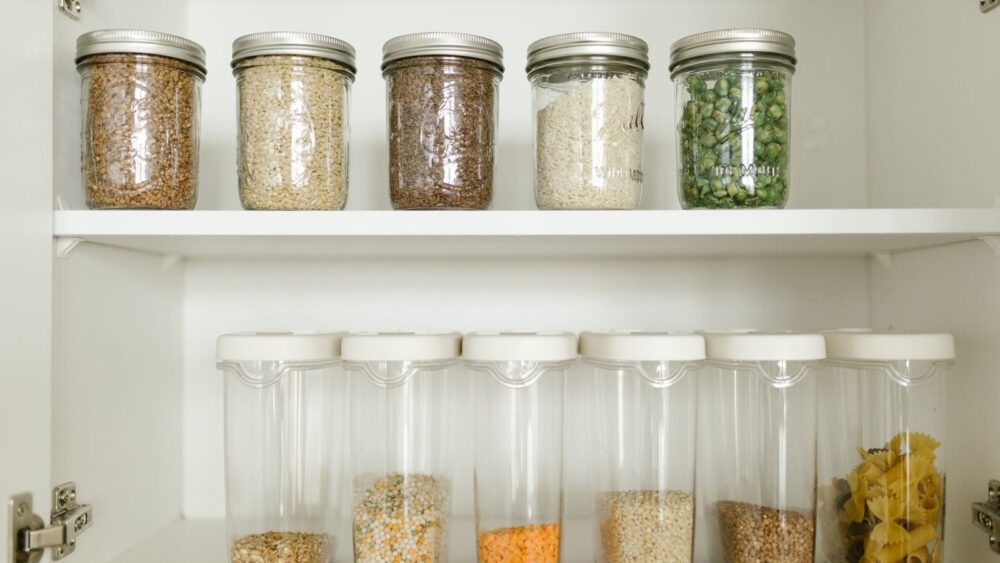
- Airtight containers for dry goods. Flour, sugar, rice, oats and pasta stay fresher and are protected from pests. Look for gasket or snap-lock lids.
- Clear sides so you can see at a glance when you are running low.
- Square or rectangular shapes use shelf space far better than round ones.
- Size to the package. A 5-lb bag of all-purpose flour is roughly 18 to 20 cups, so it needs a container of about 5 to 6 quarts. A 4-lb bag of granulated sugar fits in about 3 quarts.
- Bins and baskets for things that don’t decant well: packets, pouches, bags of chips, onions and potatoes.
- Turntables for oils, vinegars and sauces in deep corners.
- Tiered can risers so back-row cans are visible.
Storage Tips for Fall Staples
- Brown sugar stays soft in an airtight container with a terra cotta sugar saver or a slice of bread.
- Whole wheat flour, nuts and pecans contain oils that go rancid. Store them in the fridge or freezer for longer life.
- Potatoes and onions both like cool, dark, ventilated storage, but keep them apart. Stored together, onions can make potatoes sprout faster.
- Winter squash keeps for weeks in a cool, dry spot with air around it.
- Apples last much longer in the refrigerator crisper than on the counter.
Step 4: Label Everything
Labels are what make decanting work. Once flour is out of its bag, nobody can tell bread flour from all-purpose.
- Name: be specific, such as brown lentils versus red lentils.
- Date: write the purchase or opened date, or the best-by date from the original package.
- Cooking instructions: cut the directions panel off the box and tape it to the back of the container, or write the water ratio and cook time on the label. This is especially handy for wild rice, lentils and specialty grains.
- Shelf labels: label the shelf edge for each zone too, so things go back in the right place.
Removable labels or chalk markers make it easy to update dates when you refill.
Step 5: Use First In, First Out
FIFO is the simplest habit for cutting food waste: use the oldest item first.
- When you unpack groceries, pull older cans and boxes to the front.
- Put new items behind them.
- For decanted goods, use up what is in the container before topping it off, or pour the old contents into a bowl, add the new, and pour the old back on top.
- Keep backstock in its own zone so you can see how much you really have before you buy more.
Gravity-feed can racks do this automatically: load from the top, take from the bottom.
Step 6: Do a Spice Audit
Fall recipes use more spices than any other season, so this is the right time to clean them out. Spices don’t spoil in a way that makes them unsafe, but they lose flavor over time.
How to Audit
- Pull every jar from every cabinet, drawer and rack.
- Check color and smell. Crush a pinch between your fingers. If the color has faded or the aroma is faint, replace it.
- Use general freshness guidelines. Ground spices are at their best for about 2 to 3 years, dried leafy herbs 1 to 3 years, and whole spices 3 to 4 years. If you don’t know when you bought it, trust your nose.
- Combine duplicates by pouring the older jar into the newer one only if they are both still fragrant.
- Write the date on the lid of each new jar with a marker.
How to Store Spices
- Alphabetize, or group by use: baking spices, savory everyday spices, chile and heat, and blends.
- Drawer inserts, tiered shelves and door racks all work well. Choose whatever lets you read every label without moving other jars.
- Buy small jars of spices you use rarely, and larger ones only for staples like cinnamon, cumin and black pepper.
Fall Spice Checklist
- Cinnamon, ground nutmeg (or whole to grate), ground ginger, cloves, allspice
- Dried sage, thyme, rosemary and bay leaves
- Smoked paprika, cumin, chili powder, chipotle powder
- Garam masala and turmeric for dishes like Chicken Tikka Masala
- Cajun or Creole seasoning for Red Beans and Rice
- Black peppercorns, kosher salt, red pepper flakes
Fall Pantry Staples Checklist
With these on hand, you can make most cozy fall dinners with only a quick stop for fresh produce and meat.
Grains and Pasta
- Long-grain white rice and basmati
- Arborio rice for Butternut Squash Risotto
- Wild rice or a wild rice blend
- Egg noodles, short pasta and lasagna noodles
- Old-fashioned oats
Beans and Legumes
- Brown or green lentils for Hearty Lentil Soup
- Dried red kidney beans
- Canned black beans, cannellini and chickpeas
Canned and Jarred
- Crushed and diced tomatoes, tomato paste
- Pure pumpkin puree
- Chipotles in adobo
- Sun-dried tomatoes in oil
- Dijon mustard
- Chicken, beef and vegetable broth
Baking
- All-purpose flour, granulated and brown sugar
- Pure maple syrup and honey
- Baking soda, baking powder, vanilla
- Pecans and walnuts (stored cold)
- Dried cranberries
Oils and Vinegars
- Olive oil and a neutral oil
- Apple cider vinegar, balsamic and red wine vinegar
- Worcestershire and soy sauce
Pantry inventory template
An inventory is a short list of what you always want on hand, with a target amount for each. Check it against the shelf once a week and buy only what is below target. The targets below suit a household cooking four or five fall dinners a week; adjust them up or down and cross out anything you never use.
Broth and canned goods
- Chicken broth: keep four 32-oz cartons; restock at two.
- Beef and vegetable broth: two cartons each; restock at one.
- Crushed tomatoes (28 oz): three cans; restock at one.
- Diced tomatoes (14.5 oz): three cans; restock at one.
- Tomato paste: two cans or one tube; restock at one.
- Canned beans (black, cannellini, chickpeas): three cans each; restock at one.
- Pumpkin puree, coconut milk, chipotles in adobo: two cans each; restock at one.
Dry goods
- Long-grain or basmati rice: 5 lb; restock at 1 lb.
- Arborio and wild rice: 1 lb each; restock when the open bag is half gone.
- Brown or green lentils: 2 lb; restock at 1/2 lb.
- Dried beans: 1 lb each of red kidney and one other; restock when empty.
- Pasta: 3 lb short pasta, 1 lb lasagna noodles, 1 lb egg noodles; restock at one box left.
- Oats: one large container; restock at one-third.
- Panko or breadcrumbs: one box; restock when open.
Baking
- All-purpose flour: 5 lb; restock at 2 cups left.
- Granulated sugar: 4 lb; brown sugar: 2 lb; restock at 1 cup left.
- Baking soda, baking powder, vanilla: one each; restock when half gone.
- Maple syrup and honey: one bottle each; restock at a quarter left.
- Pecans and walnuts (in the freezer): 1 lb each; restock at 1 cup.
Oils, vinegars and sauces
- Olive oil: one open bottle plus one spare; neutral oil: one bottle.
- Apple cider, balsamic and red wine vinegar: one bottle each; restock at a quarter left.
- Soy sauce, Worcestershire, Dijon, hot sauce: one each; restock at a quarter left.
Spices
Par is one jar each; restock when you can see the bottom.
- Everyday: kosher salt, black peppercorns, red pepper flakes, garlic powder, onion powder.
- Herbs: thyme, rosemary, sage, oregano, bay leaves, Italian seasoning.
- Warm: cinnamon, nutmeg, ginger, allspice, cloves.
- Savory: smoked paprika, cumin, chili powder, chipotle powder, garam masala, turmeric, Cajun seasoning.
Produce that lives in the pantry
- Yellow onions: a 5-lb bag; restock at three onions.
- Garlic: three heads; restock at one.
- Potatoes: 5 lb; restock at 2 lb.
- Sweet potatoes and winter squash: two or three each; restock with the weekly produce shop.
Copy this into a note on your phone or print it and tape it inside the pantry door. Checking it takes 5 minutes and replaces the guesswork that leads to five cans of black beans and no tomato paste.
The 20-minute weekly reset
An organized pantry drifts within a week unless someone puts it back. This reset is built to fit right before you write the grocery list, so the two jobs feed each other. Set a timer; the point is to finish, not to reorganize.
- Minutes 0 to 3: clear the counter and the floor. Put away anything that landed outside the pantry during the week, like the open bag of rice by the stove or the box of pasta on top of the microwave.
- Minutes 3 to 8: walk the zones. Shelf by shelf, move stray items back to their zone and turn labels to face front. Do not empty anything; just put things where they belong.
- Minutes 8 to 12: pull forward and check dates. Slide older cans and boxes to the front. Move anything close to its date into a “use this week” basket on an eye-level shelf.
- Minutes 12 to 16: check the inventory. Run down the template above and write down anything below its restock point. That is the pantry half of your grocery list.
- Minutes 16 to 19: top off and wipe. Refill any decanted container from backstock, older contents on top. Wipe one shelf, or the spot where something spilled.
- Minutes 19 to 20: plan one meal from the basket. Half a box of lasagna noodles becomes a small pan of classic meat lasagna; a lone can of black beans goes into chipotle black bean soup.
Once a month, stretch the reset to 30 minutes and add three things: check the freezer inventory, wipe down the spice rack, and look in the corners for any sign of pests. Twice a year, in early fall and early spring, do the full empty-out from Step 1.
If someone else in the house does the shopping, hand them the restock list and the inventory sheet. The system only works when the person buying the food knows the targets.
Keeping It Organized All Season
- Weekly 10-minute reset: before you write your grocery list, put stray items back in their zones, pull older items forward and note what is low.
- Keep a running list on the pantry door or on your phone. Add items the moment you open the last one.
- Shop the pantry first. Plan a meal or two each week around what you already have.
- Monthly check: wipe one shelf, check dates on backstock and look for pest signs.
An organized pantry pairs well with an organized freezer. If you are stocking up for the season, the fall freezer meal prep plan uses many of these staples.
Frequently asked questions
What is the best way to organize a pantry?
Empty and clean the shelves, sort items into categories, assign each category a zone, store dry goods in clear airtight containers, label everything with names and dates, and use first in, first out so older items get used first.
How long do spices last?
Spices don’t become unsafe, but they lose flavor. Ground spices are best within about 2 to 3 years, dried leafy herbs 1 to 3 years and whole spices 3 to 4 years. If the color is faded or the aroma is weak, replace them.
Should I store potatoes and onions together?
No. Both like a cool, dark, ventilated spot, but onions can make potatoes sprout faster. Keep them in separate bins or baskets, and don’t refrigerate whole potatoes.
How do I keep pantry moths out of flour?
Store flour, grains and nuts in airtight containers, check new packages for webbing, wipe up spills, and keep whole grain flours and nuts in the fridge or freezer. Discard anything infested and clean the shelves well.
What pantry staples should I have for fall cooking?
Broth, canned tomatoes, pumpkin puree, lentils and dried beans, rice including Arborio and wild rice, egg noodles and pasta, flour, brown sugar, maple syrup, apple cider vinegar and warm spices like cinnamon, nutmeg, sage and smoked paprika.